Creating a Queue in Dynamics CRM can be useful when managing incoming email, but to feel the benefit from a service management or support perspective adding Routing Rules can add a whole new dimension.
It can be useful for an organisation to manage incoming case emails in CRM based on the content or level of service offered to their customers. In the latest version of MS Dynamics CRM Online it is possible to configure “Routing Rules” against the Case entity to push cases to the correct queues using a combination of workflow processes and routing rules.
In this example I will be using a previously configured Case field named “Service Level” to define the queue to which the case will be assigned in CRM, in this case I will use “Service Level” as an option set with the values – “A”, “B” and “C”. The solution will also include the use of:
- Routing Rule Sets
- Rule Items
- Queues
Sometimes we may need to create additional workflow as the “Routing Rules” functionality only route cases automatically when cases are created either by Automatic Case Creation Rules or by Workflows. Routing Rules are applied to Manually Created cases by clicking the Apply Routing Rules button. So we will need to use workflow functionality to route cases to queues when needed.
Please Note; The same logic can be applied to other attributes in CRM either out of the box or custom. The same solution should apply to CRM Online and CRM 2015 On Premise depending on your current version/UR installed.
Step 1 – Create Additional Queues for Service Levels:
To set up routing rules in CRM you will need to create or utilise existing queues, this step includes the creation of queues from scratch and assumes that the required mailboxes/server sided configuration for email has been completed. For more on this subject see this TechNet post: Create_Profile
In your CRM 2015 organisation navigate to; Settings > Service Management > Queues and click “New” to create a new queue. Enter the “Name” and then select “Public” for the “Type” field. Insert the email address required for the queue, for example; @.onmicrosoft.com. Then click :Save and Close” to create the queue. Repeat this step for the queues required for additional service levels, (in this example B and C).
Step 2 – Create and Configure a Routing Rule Set for the Case Entity:
In your CRM 2015 organisation, navigate to; Settings > Service Management > Routing Rule Sets and click “New” to create a new Rule Set. Complete the required fields giving your Rule Set a “Name” and click “Save” – do not close the record at this point.

Step 3 – Create a New Rule Item:
The next step is to add your “rule items’, these will contain the conditions that you want to apply to the routing rule set.
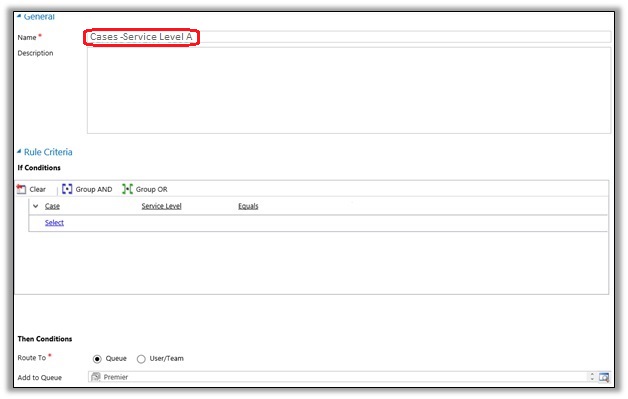
From within your new Routing Rule record click “+” to add a new “Rule Item” in the sub-grid controls. In the “create record” window add the name of the rule item; in this case. Then navigate down to the “Rule Criteria” tab and add your “If Conditions”.
The conditions in this example are; Case > Service Level > Equals > A. (This will look for all Cases that are assigned the “A” value in the Service Level option set). Navigate to the “Then” conditions and for “Route To” select “Queue” and the Queue you require. Then click “Save and New”.
Repeat this step for your other variables, for this example; Service Level B and C and set the queue you wish to route to in CRM. After creating your last rule click “Save and Close” and then activate the Rule Set created in step 1.
Please Note; this will be the same interface as the Advanced Find function in CRM and so should be easy for System Customiser , Administrators or End Users to configure (security role permitting).
Step 4 – Test Routing Rule Set:
As mentioned earlier in the post, it is still necessary to supplement your rules with workflow processes at this point in time, therefore the next step is to create the required workflow in CRM if you want cases to be assigned to a particular queue based on updates to field values such as ‘case escalated’ or status reason.
To test your routing rules send an email to the email addresses used for your queues, for example;
To: username@on.microsoftcom
Subject: Support Request Routing
Body: This Case should be routed to queue.
I hope this helps, if you want to know more about working with Queues in CRM with your Routing Rules, check out this post; Using Queues in Microsoft Dynamics CRM – and happy CRM’ing!
